About Templates
Templates are a crucial part of the sepioo® System and are the core of the service we provide to all our customers at PDi Digital. They can be managed by any user who has access and basic knowledge about them. Templates must be managed in the sepioo® Platform, and in order for them to work as intended, some configuration is required. The amount of configuration depends on the required complexity of the image to be displayed.
Templates can be configured to display 3 basic colors:
- Black: All Digital Displays
(RGB: 255, 255, 255 / HEX: #FFFFFF) - White: All Digital Displays
(RGB: 0, 0, 0 / HEX: #000000) - Red: Only some models of Digital Displays
(RGB: 255, 0, 0 / #FF0000)
On the Displays it is possible to show anything that can be designed with these 3 basic colors
- Static data: Pre-configured in the template and it never changes on that page
- Dynamic data: Can be configured to show data that changes, primarily from scales, sensors, the object custom fields or sepioo® Platform itself
- Images: The size and the quality of the image needs to be appropriate to show on different sizes or in different use cases
- Bar codes: Can be read directly from the screen with a bar code reader
- QR codes: Can be read directly from the screen with a QR code reader/smartphone
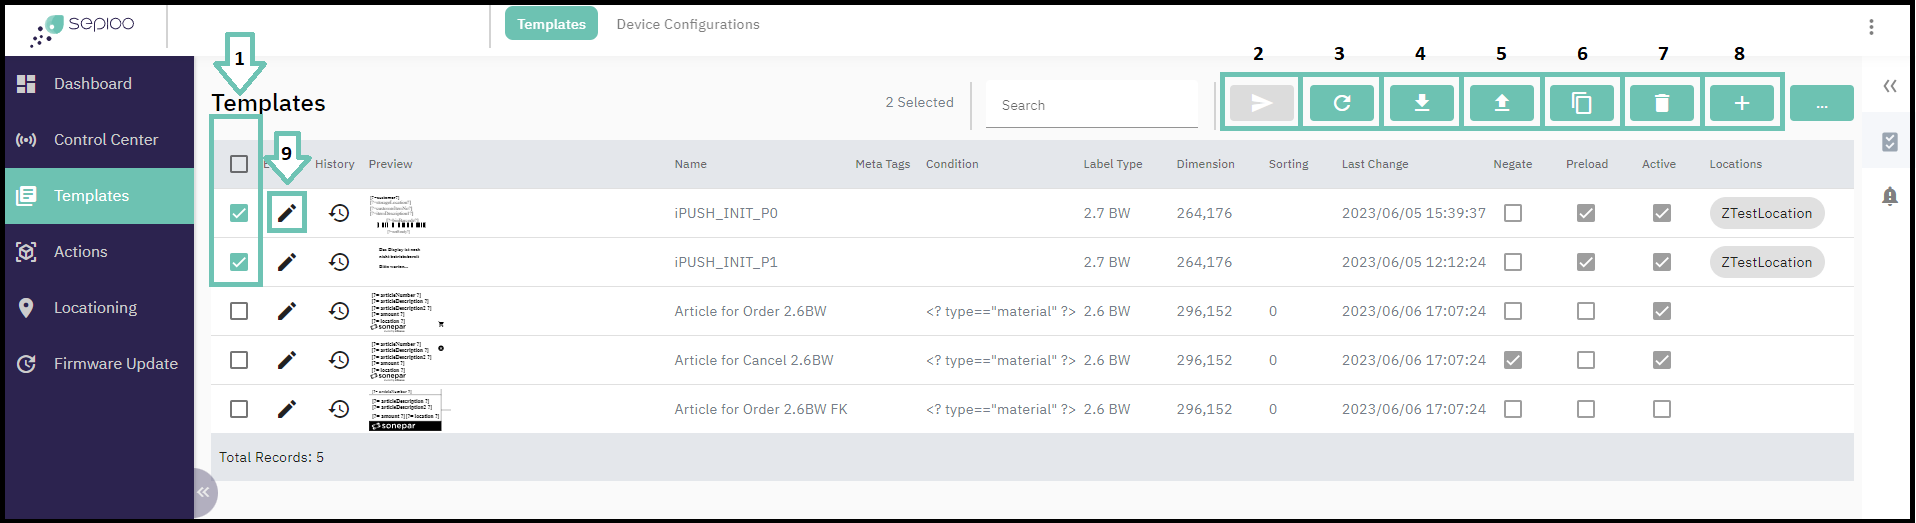
Templates can be accessed and managed by opening the “Templates” module in the sepioo® Platform. Once opened, there will be a list of Templates and many options offered for the user:
- (1) Select one or more templates
- (2) Apply the template to a specific display (only if only one is selected)
- (3) Refresh the template page
- (4) Export the templates (only if at least one is selected)
- (5) Import the template
- (6) Copy template (Only if at least one is selected)
- (7) Delete template (Only if at least one is selected)
- (8) Add a new template from scratch
- (9) Edit an existing template
Using the options
Many of these options are self-explanatory and don’t require much explanation, but some options do require some specific notes.
- Select one or more Templates: This is used to perform bulk Actions such as deleting, exporting, or copying the Templates.
- Deploy a Template to a Display: This option is useful if you are working with Templates and want to preview them on the test Display(s).
- Refresh the Template page: This is usually used when you are working on the Template page and do not want to refresh it.
- Export the Templates: This can be done to transfer one or more Templates from one sepioo® Instance to another. For example from one account to another or from sepioo® Staging to sepioo® Production.
- Import a Templates: Same as exporting, it is usually used when one or more templates need to be migrated quickly and efficiently.
- Copy a Template: A handy option when there is no need to build a new Template, but there are several variations of the same Template, where only a small update is needed for the copied ones to adapt them to the use case.
- Delete the Template: Self-explanatory action that should always be used with caution.
- Add a completely new Template or edit the existing one: This option is of course much more complex and more information can be found below.
Creating a new Template/Editing the existing one
Editing a template can be simple or complex, depending on the use case. Typically, static data (text or numbers), images, or barcodes can be configured and deployed on the digital displays within minutes. Dynamic data of any kind, or static data that changes based on conditions, is more complex and requires good logic and precision in configuration. The only limit to how much information can realistically be displayed on a page is the size of the screen. If more information needs to be displayed, another page must be configured.
Creating a new Template or editing an existing one follows the same rules and logic, the only difference is how you start the process.
In general, editing a Template that is in active use should be done by a more experienced person to avoid mistakes. Otherwise, a Template to be edited can be copied, changes made to the copy, tested, and then deployed to “live” Digital Displays.
Clicking on the “+” button in the templates opens a new pop-up menu where basic template information must be added:
- Template name: Can be changed, but needs to be clear and unique to distinguish the specific template.
- Label type: When defining a template, the correct display type and size must be selected to ensure proper alignment with the page.
- A single template can be applied to multiple display types such as BW, BWR and BWRY, as long as they have the same size.
- Unsupported colors will either appear as white or be approximated to the nearest supported color.
- Render to page: This tells the system which page we are working on and how to sort them once they are shown on display and switched in order. Maximum number of pages is 12.
- Active: This needs to be checked in order for the Template to be loaded to any Digital Display.
- Preload: This can be checked and configured if the use case requires the Template to be preloaded on the Digital Display, but not immediately shown. The preloaded templates can be accessed by switching the page using buttons on the Display itself, or from sepioo® Platform.
*Once an image is preloaded, it can’t be removed from the display, only edited to show something different or left blank. - Negate: This function inverts the colors black and white in the already configured Template.
Condition
The Condition is there to provide additional requirements for each Template if necessary. Usually it is done when user needs to limit the Template only on some specific Displays or types of Displays, or when use case requires the Template to be shown only in specific cases that depend on dynamic data that can come in to sepioo® from a scale, sensor or sepioo® itself.
Clicking on the “?” symbol on the right side of the condition window will help the user to see some examples of what can be done with the Condition, and if done from scratch, some basic knowledge of JavaScript programming language is required.
Button Event Message Mapping
This option is not often used, but this section can be configured so that the data (usually dynamic) from the Custom Fields object is logged in the Message Queue.
Edit Image
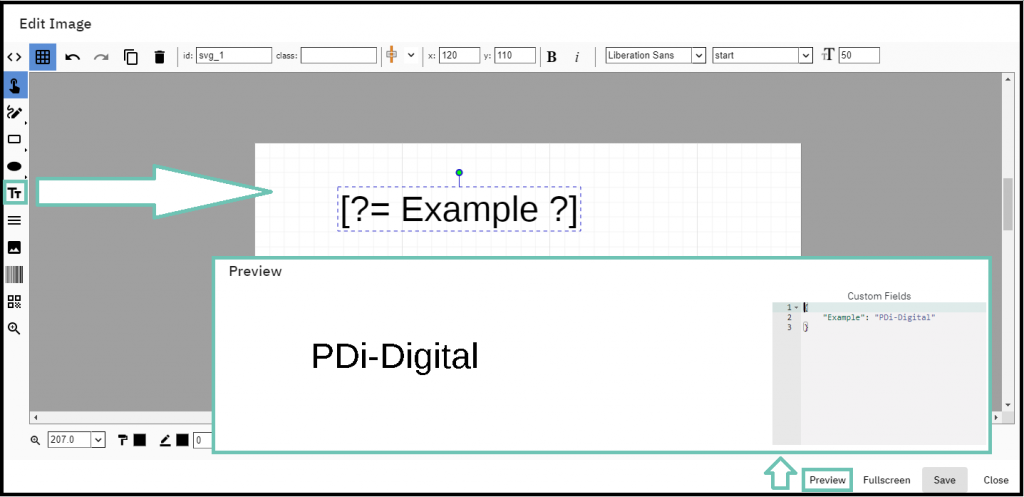
Dynamic data
Dynamic data requires additional configuration in the format [?= Example?] This will pull any data written in the Display Custom field under the ““Example”:” field directly to the Digital Display. Also, any additional changes to this field will be automatically updated on the display after the change is saved.
Please note that this part of the process is case sensitive and will not work if the Template configuration and the Custom Field value are different in terms of upper/lower case or spaces before/after the word.
Clicking the “Preview” button and entering the sample Custom Field in the new window will show the user how it would look.
Bar codes/QR codes
The information from the Custom Fields can also be converted into a barcode or QR code: This is done by dragging and dropping the bar/QR code input field into the Template and editing it to set the correct information. The system will encode the configured information into the bar/QR code and it will be the result of scanning the code from the Display with a device or application.
In this example, scanning the bar code will read a result in “Example123456”.
The logic of configuring the QR code is identical, it just uses a different type of code.
The QR code can be generated directly from the custom field of the Object which contains a link to the desired page.
In this case, it is more reliable to use a different syntax in the template: [?- … ?]
Reason for this is a specific library used, and using the “standard syntax” could change the link and make it invalid upon scanning it from our Digital Displays:
[?= … ?] –> Outputs the value into the template (HTML escaped)
[?- … ?] –> Outputs the unescaped value into the template

Images and logos
It is possible and common to display images on our Digital Displays. The images to be used on the Displays should be of good quality and originally a good size for the dimension of the Display. Using a small image on a large Display can result in poor quality when it is displayed, or reducing the size of a large image for the small Display will make it too detailed and hard to distinguish what is on it.
In addition, if the image to be displayed should be colorized appropriately. If the image is multi-colored, the Display will have to convert it to the basic colors that the Display is capable of showing, and a lot of quality will be lost.
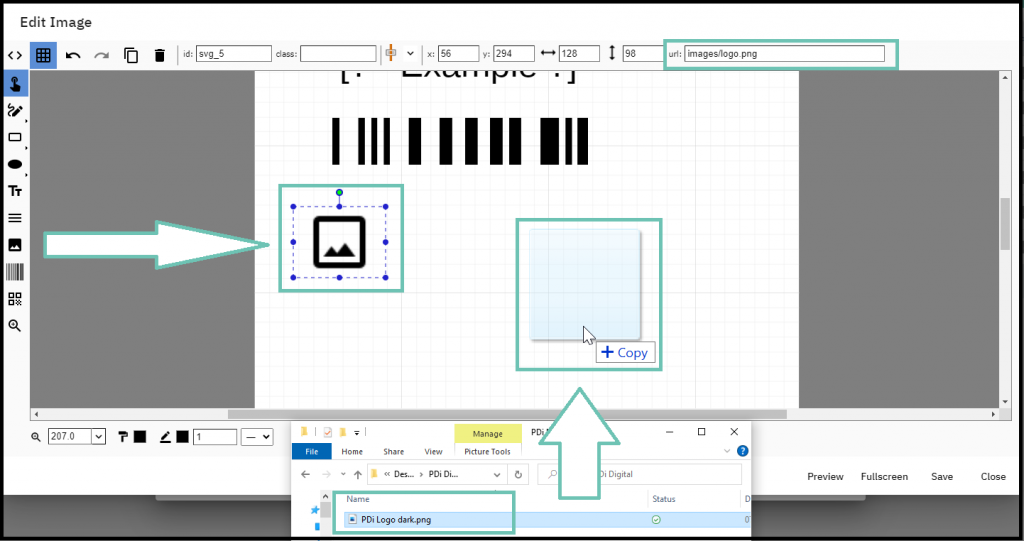
Inserting an image into the Template can be done by inserting a link from an image hosting site, and that is done by dragging and dropping the image icon into the Template. After that, a link containing the image can be added to the top bar.
The other way to insert an image into the template is to simply drag and drop it from a local folder into the Template. This will remain a static image stored in sepioo® Templates and will not change unless it is changed manually.
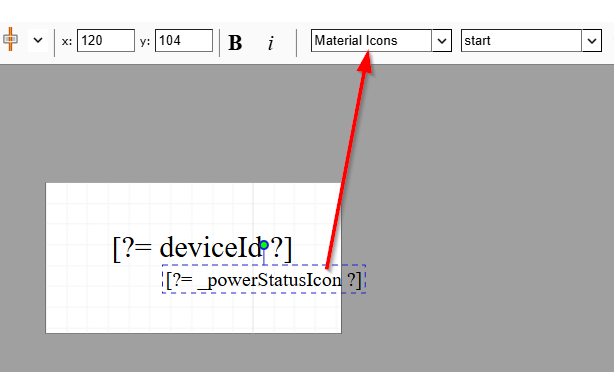
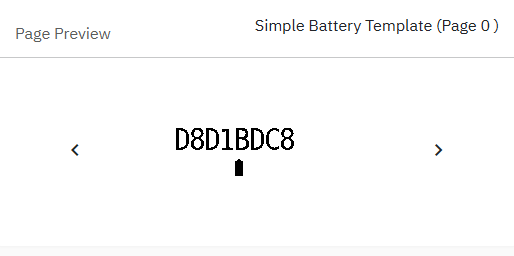
Simple template showing battery percentage icon
Rendering a battery icon dynamically (e.g., showing the current battery level or charging state) is not only possible — it’s actually quite straightforward!
You can achieve this using a simple expression combined with the Material Icons font.
- Add a Text or Multiline Text Tool.
- Set its font to Material Icons.
- Set the text property to: [?= _powerStatusIcon ?]
Conclusion
Templates are very flexible, and these are basic examples of how to work with the 3 most commonly used options in them. They can be combined according to the needs, and they can be pushed to the Digital Display manually, or they can be pushed/switched by actions and/or keystrokes on the Displays themselves (if the model supports it).
In order to have a fully functional system that works automatically, additional special features must be configured. You can read more about this in the articles below: