sepioo® NB-IoT Quick Start Guide

01 Unpacking

Carefully remove the device from the packaging and place it face down on a flat, clean and soft surface.

02 Insert Nano SIM

Loosen the two screws (Allen key, size 2) on the back of the display.

Open the flap and put it aside.

Slide the metal bracket and open it. Then insert the nano SIM and close the bracket again.

Close the flap again and hand-tighten the two screws.

Note:

It is good practise to plug in the Display for a few hours in to a generic USB charger (phone charger or dedicated USB charging port) using a USB-C cable. 

This way we can make sure that the Device will not run out of battery during the process of Activation/Registration.

03 Activate your device

Press the bottom button for more than 5 seconds (until the green LED lights up for 2 seconds) to activate the device.


Please note that the image in this article and chapter is an example and the actual color of the screen can differ based on which Firmware version is installed on the Display. 

  • Displays with FW 1.5 and above will show a Black screen color when they are turned OFF. 
  • Displays with FW 1.4 or lower will show White screen color once they are turned OFF.

After that an inverted page will be displayed and the device will try to connect to a NB-IoT/LTE M network.


Please note that the image in this article and chapter is an example and the actual color of the screen can differ based on the Firmware version of the Display. 

  • Displays with FW 1.5 and above will show a White screen color when they are turned ON. 
  • Displays with FW 1.4 or lower will show Black screen color once they are turned ON.

04 Register your device in sepioo®

If you do not yet know how to register a device in sepioo®, please read the following article:

Objects and how to add them

05 Device Configuration in sepioo®

In order to activate and start using a NB-IoT Digital display, a Device configuration needs to be configured in sepioo® Platform. 

This can be accessed by clicking Templates -> Device Configurations and clicking the big “+” button in the top right corner of the window.

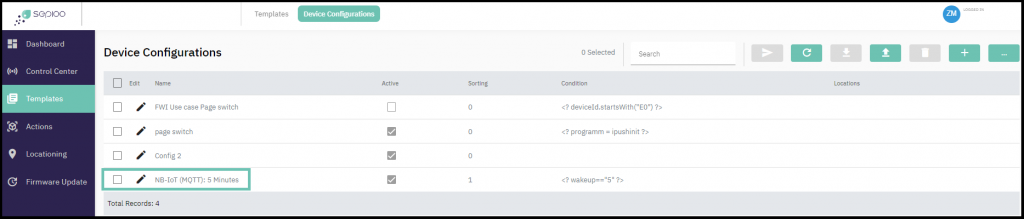
Once the New Device Configuration window is open, please proceed with filling up the needed data:

  • Name: Mandatory field, and it is recommended for it to be recognizable and easily identifiable. An example: NB-IoT: 5 Minutes
  • Sorting: 
  • “Active” checkbox: Needs to be checked once the Configuration setup is correct in order for it to be a functional Device Configuration.
  • “Flags”: Not needed for this use case.
  • “Condition” window: Here we can set up custom conditions and distinguish how each Configuration will affect specific Devices or Groups of devices. In a example we are using today, it is set to affect only the NB-IoT Displays which have a specific wake up time configured in their custom field:

    The condition in our example is: <? wakeup==”5″ ?>

  • Locations: Needed if the Use Case demands different for example wake up time for different locations and groups of NB-IoT Digital Displays. Naturally, the Location needs to be created beforehand, or selected in a later stage.
  • “Button Configuration”: Not needed for this use case.
  • Choosing Device Model: Not needed for this use case.

    NB-IoT Configuration:
    This section needs to be configured and most of the information will be provided by the Telephone Service Provider  (TSP) for the Sim Card installed in to the Digital Display.


  • APN: Provided by the TSP
  • OP-Mode: The option “NB-IoT (1)” can be selected for most use cases, but it depends on the TSP and area where it will be used
  • User Name and Password: Not Mandatory
  • Bands: This setting can be set by checking the options 3, 8 and 20 (for Austria). It can depend on the country where the Device is used. 
  • Scan Sequence: For most Use Cases the option “NB-IoT then eMTC” can be chosen
  • Retries: Recommended setting is 50.
  • Network information fields: These fields are not needed, and they depend on the TSP and their requirements.
  • Wakeup: Here the user has option to select the interval in which the NB-IoT will connect to sepioo and check for the updates if there is any. For first time use, it is recommended to set it up to 5, then adjust it once the Use Case is fully built. Naturally, the more often the Wakeup call happens, batteries will be drained faster. 
  • “Wakeup at full hours” checkbox: Not needed, unless the Use Case requires it.

    GNSS Settings: This provides the option to locate the NB-IoT Digital Display and it can be configured if the Use case requires it. Naturally, using or not using the GNSS will affect the Batteries. 

  • Constellation: Recommended setting is “Galileo”
  • Precision: Depends on the use case.
  • Retries: The recommended and default value is 10.
  • Wakeup: This determines how often the Device will refresh the location.

    CRON window is there to configure custom options for custom use cases. Usually not needed.

Once the settings are complete, save the Configuration to sepioo. The Configuration can be adjusted at any point, and there is no limit on how many different configurations can be saved, but they do need to be different (Condition, location, wake up time, Cellular settings etc).
 
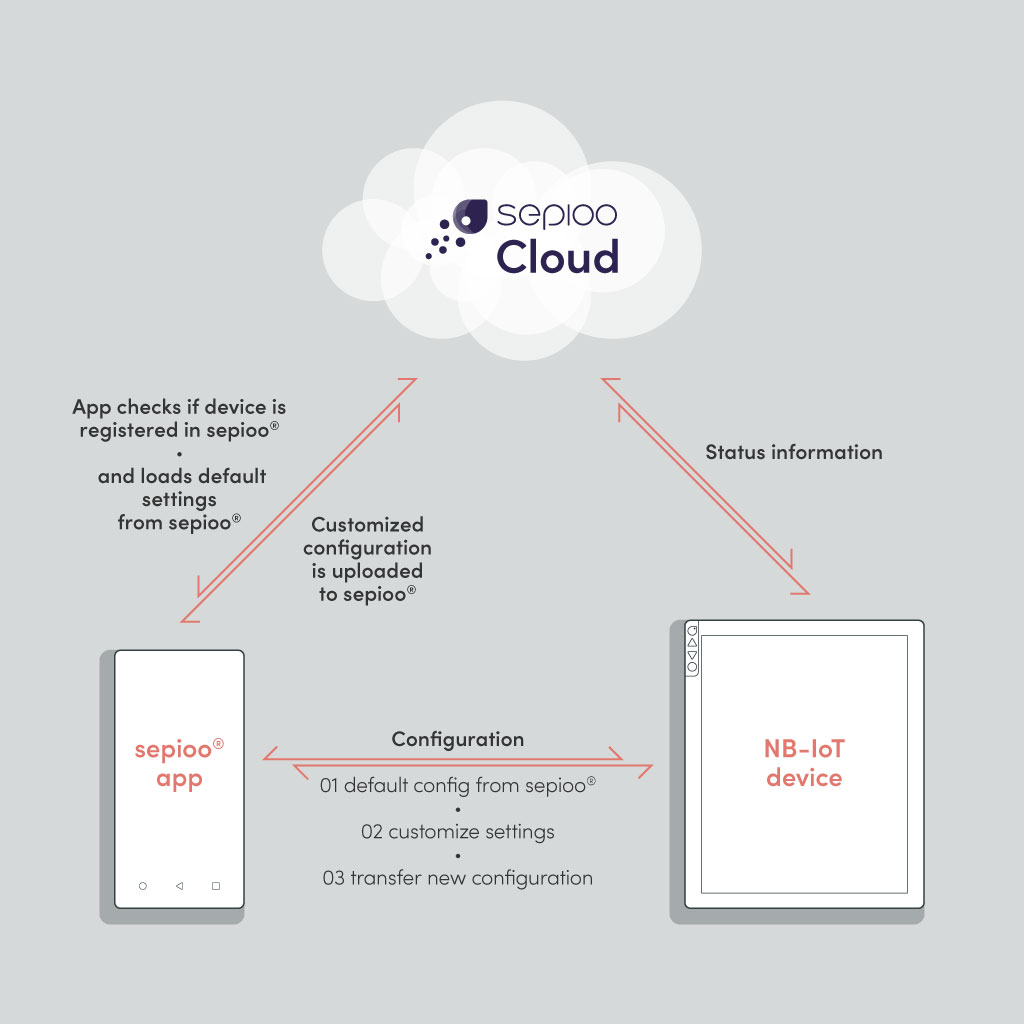
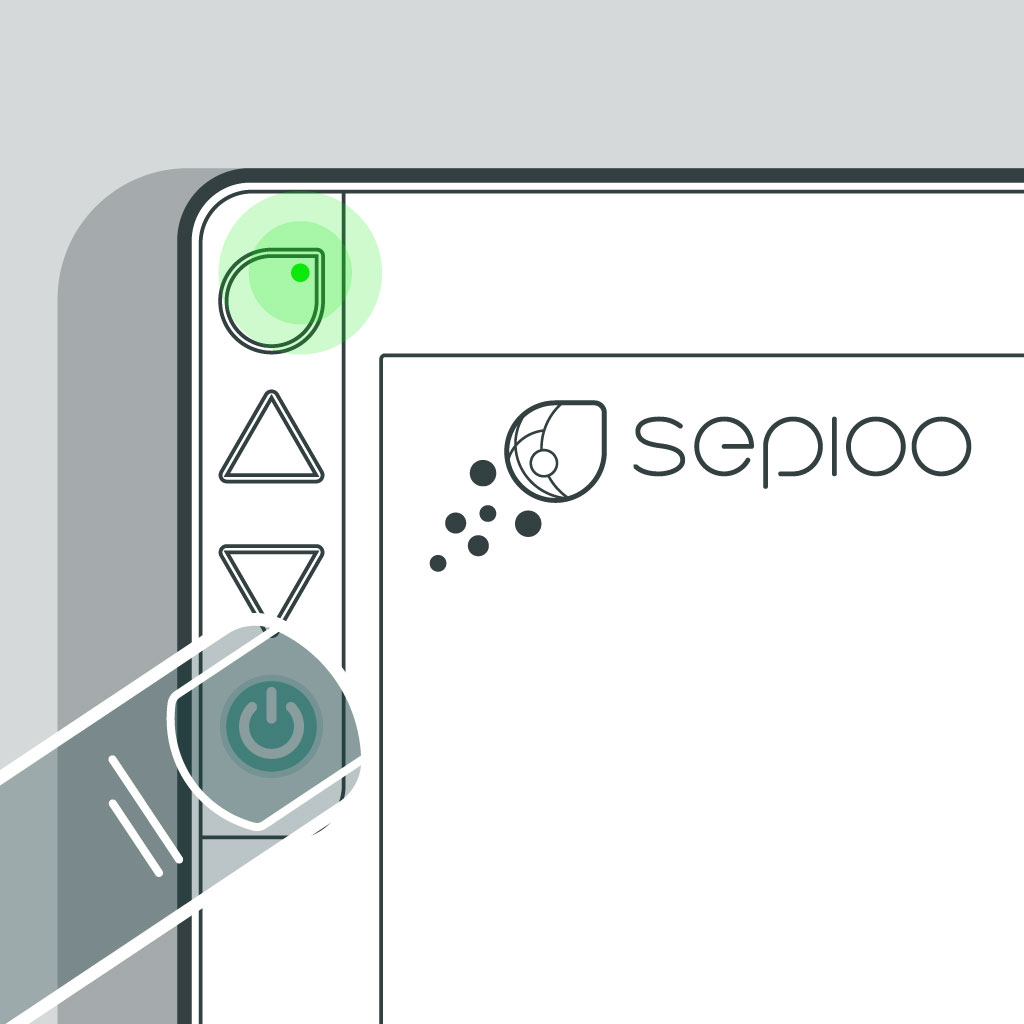
With this configuration, the process of setting up an NB-IoT Digital Display can be done since in the next step, it is needed to install the app which will connect the Digital Display with the sepioo platform and enable the Display to download the Device Configuration to use. 

In case of any problems, please don´t hesitate to contact us at support@pdi-digital.com or via our Partner Portal

06 Install sepioo® Android App

The sepioo® Android app is required to set up the device. The latest version of the app can be found in the Google Play Store.

After installing the sepioo® Android app, open it and log in with your sepioo® Account.

First there will be a pop up window which requires the user to select the location in which the NB-IoT Digital Display is registered in. 

After selecting the Location, tap the “NB-IoT Configuration button on the main screen. 

07 Go to NB-IoT Configuration

Select the “Configuration” function from the side menu which can be accessed by tapping the icon in the top left of the screen.

08 Activate BLE on your device

Press and hold the “UP button” until the green LED starts flashing. BLE is then active for 1 minute.

09 Transfer configuration

To transfer the configuration to the device, the sepioo® App must be used. Proceed there as follows:

  • SELECT your device from the list to load the default settings from sepioo®.

    This will work only if the NB-IoT Digital Display is registered correctly in the sepioo® Platform, and the correct Location and account has been selected.
    If successful, the Device Configuration which was set earlier in sepioo® will be shown on the app screen. 

  • Check if the configuration is what should be.
  • Scroll to the bottom of the screen and  SEND the configuration to the device.
 

If you receive an error when trying to send the configuration, please reset your app and try again. 
If the app asks if a previous configuration should be replaced, please select that option. 

After the configuration is sent, some time is needed for the NB-IoT Display to come online in sepioo® Platform, especially if this was the first time it is being set up and registered. 

If it does not come online after 1 hour, do not hesitate to contact us on support@pdi-digital.com.

10 Check connection

After 30 seconds the LED will start blinking (indicator that the display is trying to connect to the network).

If this does not happen automatically, press and hold the DOWN button for 5 seconds.

30 seconds flashing of the green LED in 2-second intervals: 
the last connection attempt was successful.

30 seconds flashing of the red LED in 2-second intervals: 
the last connection attempt was not successful.

How to switch off the device

To turn off the device, press and hold the bottom button for more than 10 seconds (until the green LED lights up for 2 seconds).

After that, the registration page is displayed again.

! In the deactivated state the device will not try to connect to the APN and sepioo® Cloud !